Exposure

23 January 2020
I was talking to an old friend of mine the other day. He has been taking photographs for a long time, I remember him shooting with a Pentax Spotmatic F, a manual camera on which you had to adjust shutter speed and aperture to centre a needle on the metering system to get the correct exposure. He knows a thing or two about photography. He was asking me about the challenges of wedding photography and we were discussing the depth of field needed for group shots to keep everyone in focus. Then he surprised me with this question: “Do you use Landscape mode for that?” He was referring to one of the pre-set auto modes available.
It struck me that here was someone who used to know how to handle a camera manually firmly rooted in camera’s automation, what hope does someone picking up a camera for the first time have?
Modern cameras are amazing pieces of technology, capable of looking at the scene in front of it, making clever decisions about how to configure the camera settings and nearly always producing a capable result. But it will always only be the result the camera is programmed to give, not necessarily the result the photographer wants.
The most important part of picture taking handled by the camera is exposure. This post will look at what camera controls influence exposure, how they change the appearance of the picture and how the photographer might use them for creative effect.
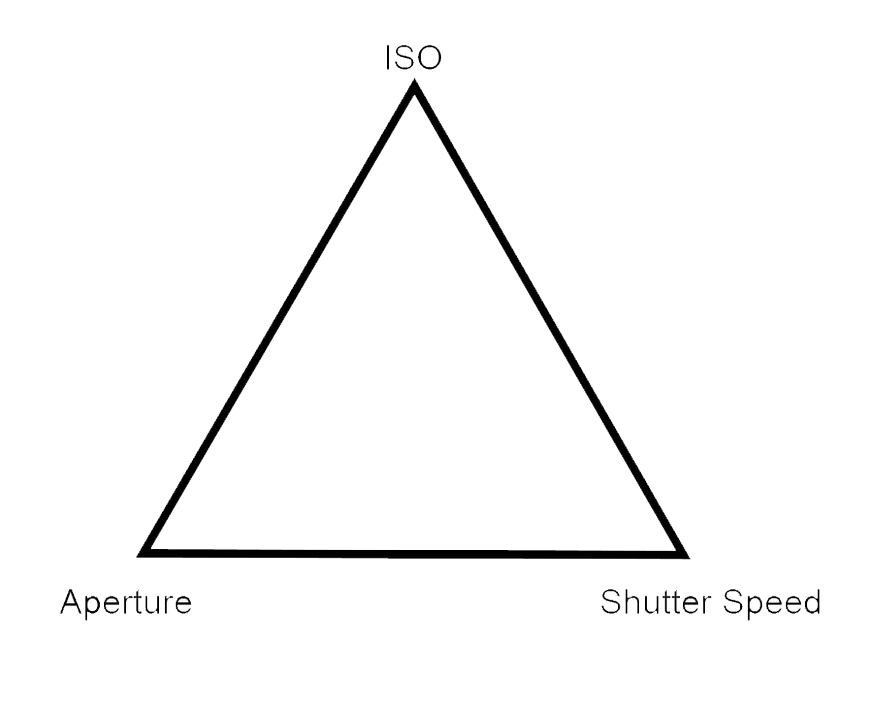
There are three settings we use to control the exposure: aperture, shutter speed and ISO. Before we can look at them though, we need to understand, in very simple terms, how a camera works
A camera has three main components: a light-proof box, a lens and a sensor.
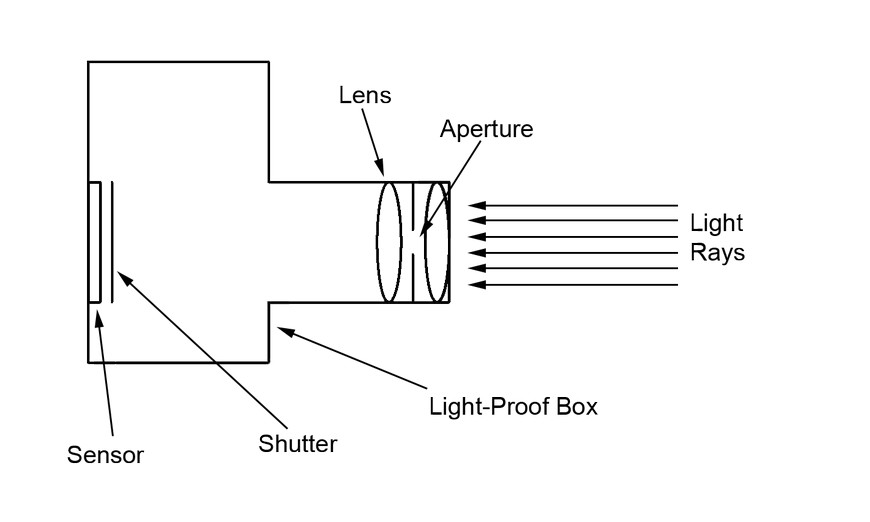
The light rays that are reflected from the subject are focussed by the lens onto the sensor. The sensor converts the light level into an electronic signal which is stored on the memory card. There are two items on the diagram which I mentioned earlier that we use to control the exposure: aperture and shutter but where does ISO come in? I will start my explanation of the three controls with this one.
ISO
The acronym “ISO” refers to the International Organisation for Standardisation. They publish globally applicable standards for everything from child seats for cars, to management systems, to currency codes. The ISO standard ISO12232:2006 determines how the sensitivity of a digital camera is measured. In photographic parlance the term ISO then refers to how sensitive the sensor is to the light falling on it. A low number (ie ISO100) means it is not very sensitive, a high number (ISO3200 and upwards) describes higher sensitivity. You might think that the more sensitive the better. There is a trade-off though. Essentially, what increasing the ISO does is to amplify the signal coming from the sensor. Just as when you amplify a radio signal you get more noise, so it is when you amplify an image signal you get noise in the image. Image noise is ugly and results in a loss of detail.
Aperture
The aperture refers to the size of the hole in the lens. The bigger the hole the more light gets in. Aperture is confusingly measured in f-stops with the smaller number denoting the larger hole. We mainly use aperture to control the depth of field. A big hole (small number) giving a shallow depth of field and a small hole (big number) a deep depth of field.
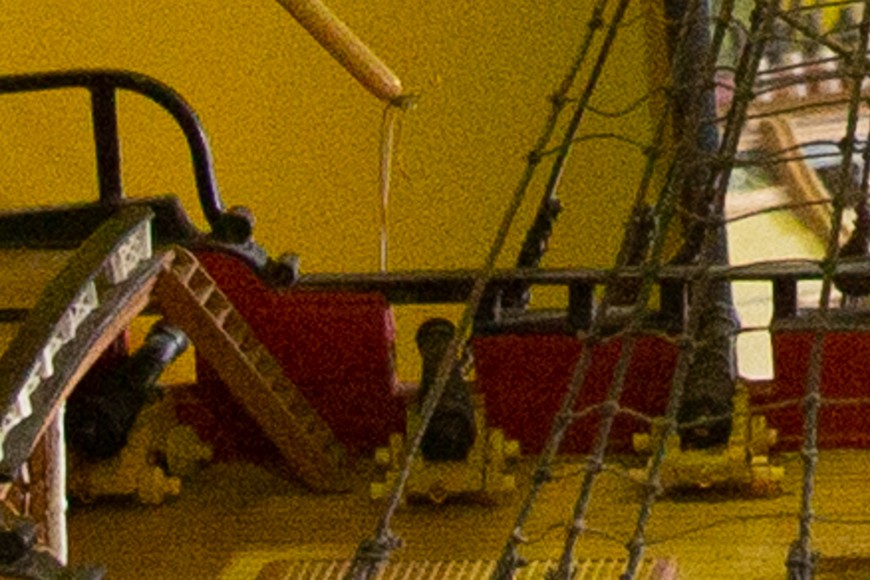
This was taken with an aperture of f1.8 and illustrates a shallow depth of field
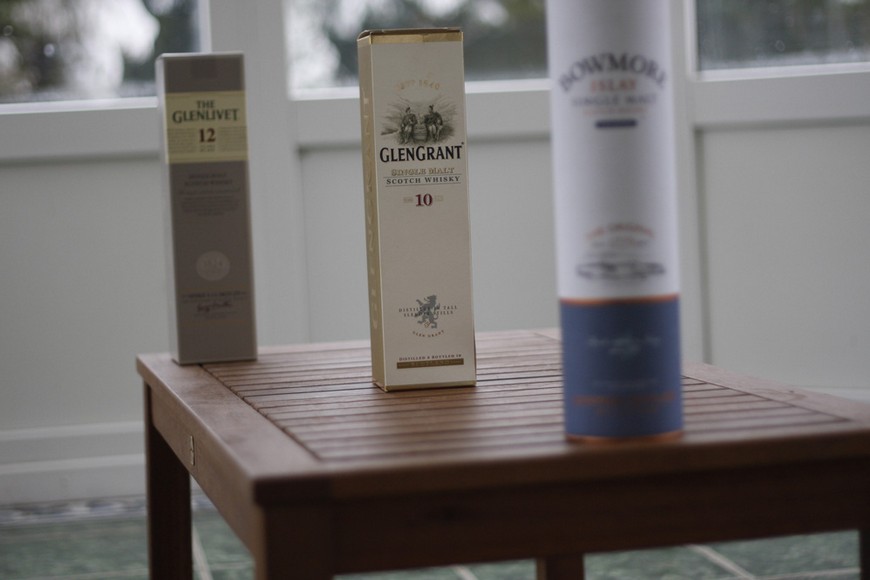
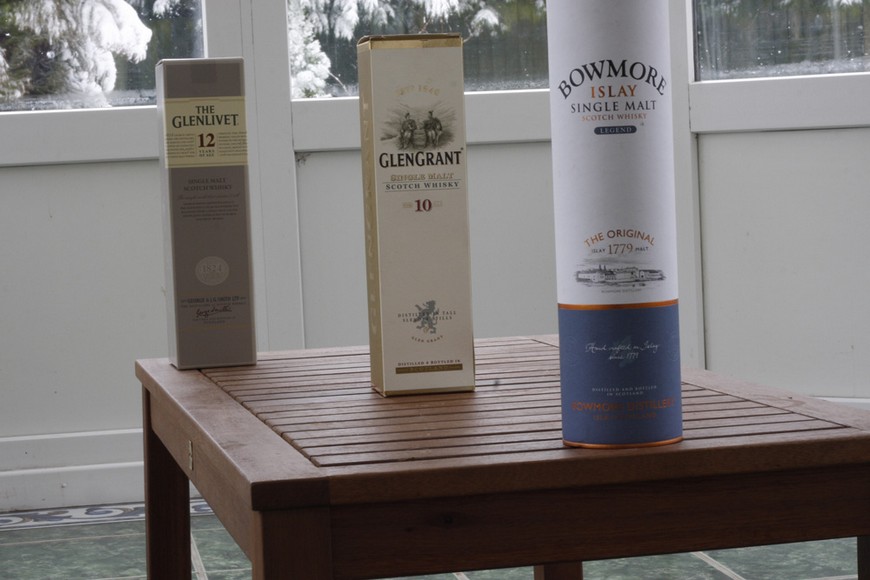
This was taken with an aperture of f22 and illustrates a deep depth of field
Shutter Speed
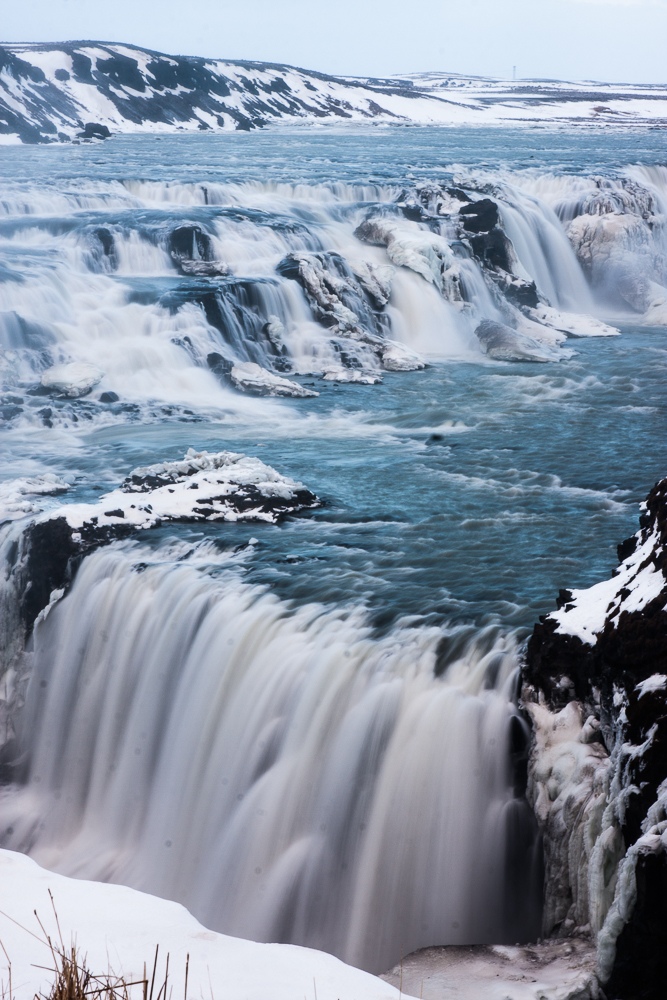
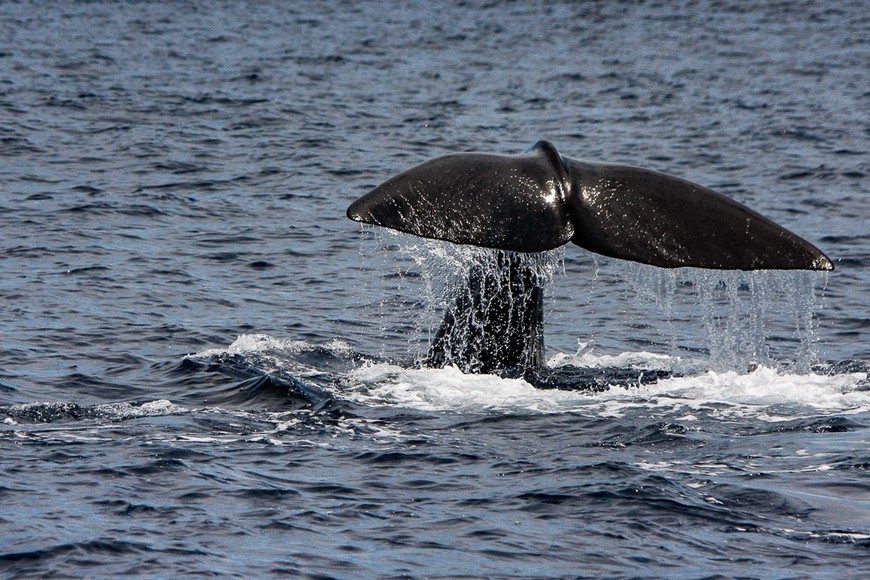
All the while you are looking through the viewfinder and composing the scene, the sensor is covered by the shutter curtain. When you press the shutter button, the shutter flies out of the way to momentarily expose the sensor to the light. The length of time of this exposure is known as the shutter speed and is measured in seconds, typically as a fraction of a second. We use shutter speed to control the motion blur.
A slow one can make rushing water look silky smooth:
A fast one can freeze water as it cascades off a whale’s tail:
Beware, though, that with slow shutter speeds you can get camera shake. No-one can hand hold a camera with rock steadiness. Some people are better than others and image stabilisation has helped a lot. As a general rule a shutter speed that is slower than 1 over the lens focal length will need care. With experience you will get better and get to know when it will be a problem.
These three adjustments are commonly referred to as the exposure triangle.
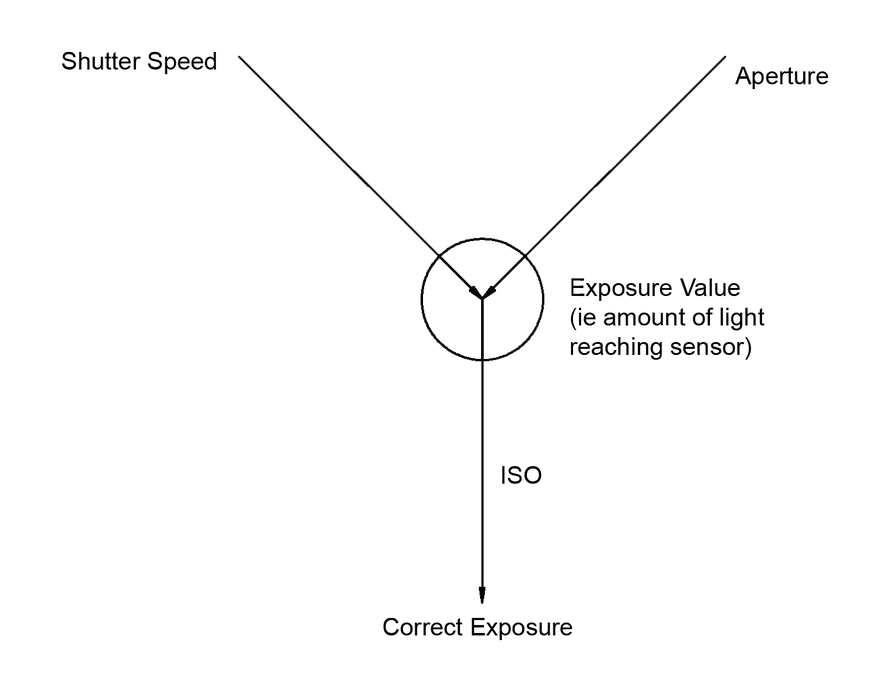
We have seen how aperture and shutter speed control how much light reaches the sensor, whereas ISO controls the sensitivity of the sensor. It might be more helpful to think of it like this:
To take control of the camera’s settings, we use the mode dial.
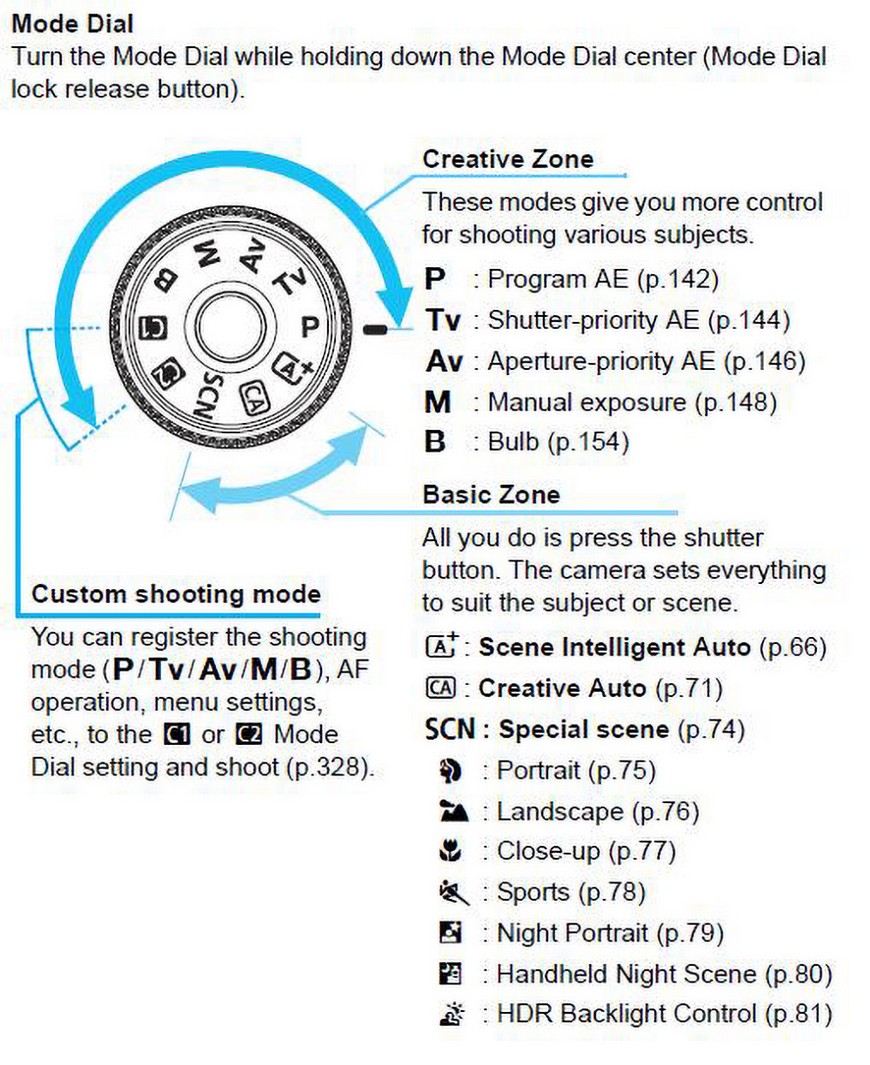
This is an explanation of the mode dial from one of my cameras. You will see it is divided into two zones. The basic zone hands control to the camera, we want to get away from this so are more interested in the creative zone and here the most interesting are labelled Av, Tv and M. These stand for Aperture Value (more commonly known as Aperture Priority), Time Value (or Shutter Priority) and Manual. My camera spends most of its time in Av mode but that does not matter, any one of these three puts control in the hands of the photographer. It is important to note that Av and Tv are still automatic modes but they enable you, as the creative photographer, to decide on what is important for your shot.
Let’s consider the steps we go through to take some typical pictures.
Landscape
I will generally start by setting the ISO and as mentioned, a low ISO gives the lowest noise and best detail so let’s try it at ISO100. Then, because I will want a large depth of field to get as much of the scene in focus as I can, I will choose aperture priority and set a small aperture, say f16. The camera will look at the scene and determine the shutter speed to give a decent exposure. Check this is within your hand-holding ability, if so click away. If not, you can increase the ISO or enlarge the aperture (or buy a tripod, but that’s another story).
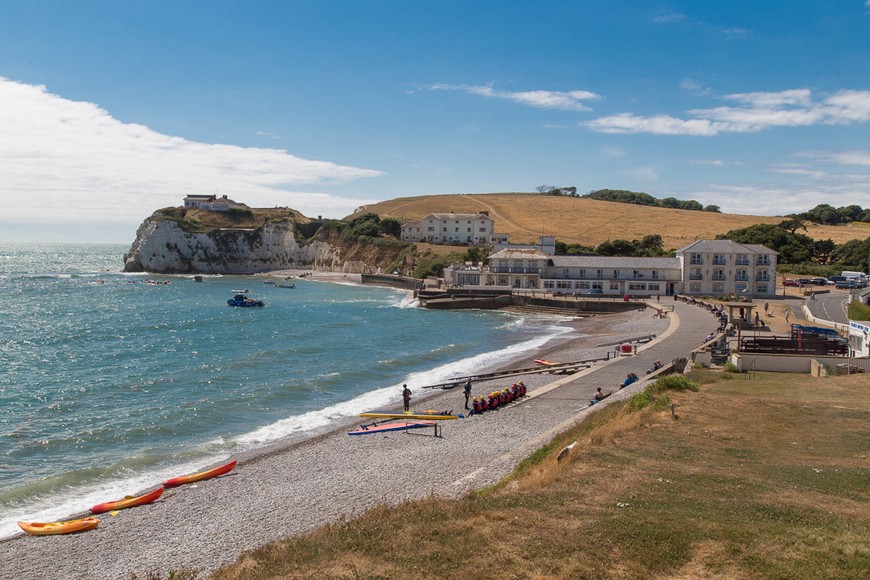
1/60 sec, f20, ISO100
Indoor Portrait
Indoor portraits are made challenging by the generally low light levels. It is a good idea to place your subject by a window to get more light which has a more pleasing, soft but directional nature. This time we will want a shallow depth of field to focus attention on the subject so it will be aperture priority again but with the lens opened as wide as it will go. Start again with ISO100 but with the low light levels this might need to be increased. Check the shutter speed and increase ISO if necessary.

1/40 sec, f1.8, ISO1600
Sports
When it comes to sports photography, we are interested in controlling motion so we need to control the shutter speed by selecting shutter priority mode. Often, we will want a fast shutter speed to freeze the action. Maintaining focus on fast moving objects can be difficult, a wide depth of field can help but we will often then need to increase the ISO to cope.
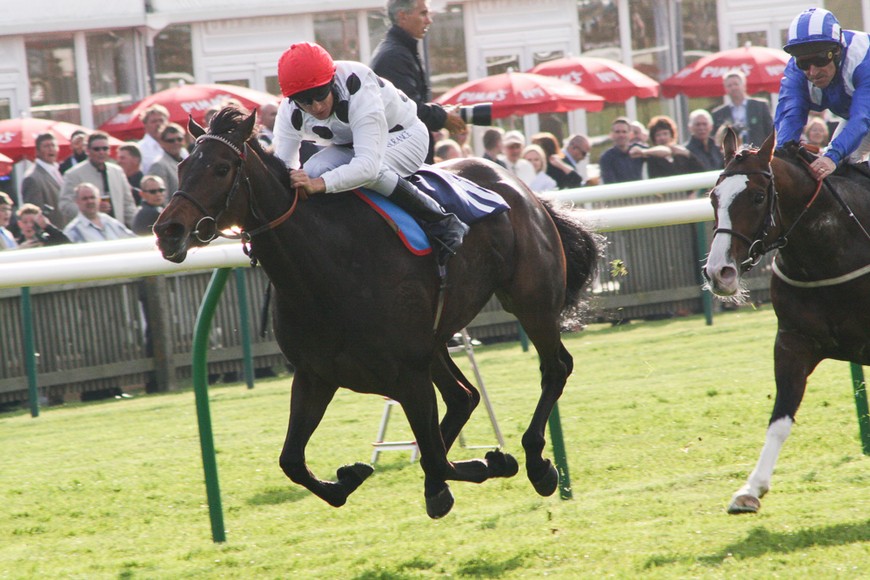
1/800 sec, f10, ISO800
Sometimes using the fastest shutter speed can freeze motion so effectively the object looks stationary. By slowing down the shutter and carefully panning the camera, we can get a sharp subject that still looks like it is moving.
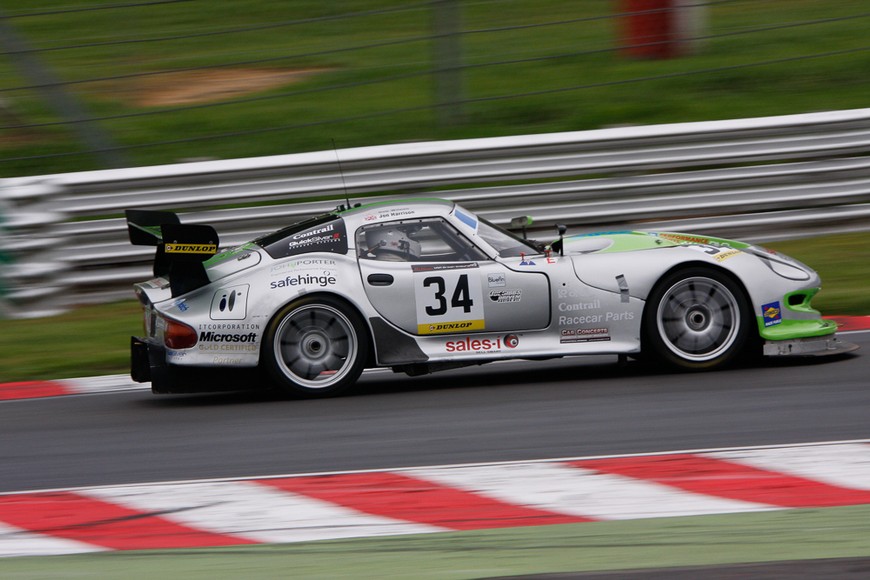
1/180 sec, f11, ISO400
This has been a very short introduction to basic camera operation. There is so much more to it and if you want to learn more, why not get in touch and see how I can help you.